Monday, 4 November 2013

Japanese Cream Bun(with mexico topping)


Been making this delicious bun for many times, I'm using the same recipe to make curry bun and BBQ pork bun as well (without mexico topping). So pleased with the results. 

Adapted from : Frozen Wings

(makes 16  with 60 gm per bun)

Ingredients A

120 gm bread flour
85 gm boiling water

Ingredients B

380 gm bread flour
75 gm sugar
6 gm salt(I'm used 3 gm only)
8 gm instant yeast

Ingredients C

120 gm cold milk
100 gm whipping cream
1 cold egg

Ingredients D

40 gm butter

Mexico topping

A  60 gm butter
     50 gm sugar
B  1 egg
C  65 gm flour
     1/4 tsp baking powder

Method:
  1. Add the boiling water from A into flour, mix until well blended to form dough. Cover and set aside to cool. Keep it refrigerated for at least 12 hours.
  2. The next day, mix B until well blended. Add in C and knead to form rough dough. Add in A and knead until well blended. 
  3. Add in D and knead to form elastic dough.(I'm used bread maker for all the kneading)
  4. Let it proof for 40 minutes or until double the size. Divide dough into 60 gm each ,  mould it round and let rest for 10 minutes.
  5. Place onto greased pan ( I'm used two rectangle pan- 8 buns per pan) and let proof for another 50 minutes or until double size.  Bake at 190 C for 15 minutes.(I'm bake at 170 C(fan) for 20 minutes)

Method for mexico topping:
  1. Cream A until well blended.
  2. Add in B and cream until smooth. 
  3. Lastly, add in C and mix until well blended.
  4. After the 2nd proof, pour in a pipping bag.
  5. Pipe the topping onto the buns just before baking.
Notes:

If use this recipe to make another type of buns like curry buns without mexico topping, need to brush whisked egg on surface of buns before baking.


Tuesday, 17 September 2013

Mini pizza


Summer holiday is over, so busy and tired. My monsters love pizza to the top, been making many times already but in the summer time we make the pizza with egg frying shapes mould. The monsters so enjoy it and they can spend at least one hour to roll, shapes and adding the topping. Good activities on summer holiday.

Adapted from: Sainsbury's food magazine
(minor changes from monsterandsharkkitchen)

(makes 2 pizzas or 12 mini pizzas)
1 teaspoon active dry yeast
1 teaspoon sugar
2 tablespoon olive oil, plus extra for greasing
1 teaspoon fine sea salt (I'm used normal table salt)
400 gm bread flour, plus extra for kneading
100 gm semolina flour
A carton of chopped tomatoes in tomato juice 
A pack of mozzarella, thinly sliced 
Some mild mature cheese, shredded 
Ingredients for topping: ham, onion, red pepper, sweetcorn, mushroom and etc.

Method: 
  1. In a large bowl, combine the yeast and sugar with 330 ml warm water and stir to blend. Let the mixture stand for about 5 minutes until foamy. Stir  in the olive oil and salt. 
  2. Add the flour, a little at a time, stirring until the dough forms a ball. Knead on a floured work surface until elastic. If necessary, add extra flour to stop the dough from sticking.(Note: I'm used bread maker to make the dough, added the wet ingredients followed by the dry ingredients).
  3. Knead the dough into a ball shape. Place the dough in a large bowl, lightly greased with little olive oil. Cover and set aside to rise in a warm place until doubled in size (around 1-2 hours).
  4. While the dough is rising, prepared the sauce by putting the tomatoes and juice into a pan and simmer until reduced to a thick sauce.
  5. When dough doubled in size, punch the dough down and divide in two. If making two pizzas, put half of the dough aside and cover with damp tea towel while prepared the another half. If just use for one pizza, wrap the remaining half of the dough in clingfilm and chill in the fridge(the dough will keep for 2 to 3 days)
  6. Preheat the oven to 220 C or 200 C (fan).
  7. Stretch the dough or use a rolling pin to roll. If making mini pizzas, stamp with your shapes mould. 
  8. Spread over the tomato sauce. Top with mozzarella slices.
  9. Put on the topping ingredients and last top with shredded cheese
  10. Bake for 10 minutes or until the crust is golden and the cheese has melted.

Sunday, 21 July 2013

Simple Biscuits


Little monster birthday on summer holiday, she order me to make some biscuits to give away to her friend before end of the school term. Then I'm just think to make something simple and cute like this simple biscuits with Winnie The Pooh cookies cutter and stamp with alphabet cookies stamp all of her friends name on every biscuits. So easy and is for the family play time together. All the kids, even the parent love it because is special. The kids love to have a biscuit with they name on it. The parent ask me a question " Where do you get it from"

Adapted From: Stork

200 gm Stork packet or any other brand butter

250 gm plain flour + extra for dusting
1 teaspoon baking powder
100 gm caster sugar
2 large egg yolks


Method:

  1. Cut the butter into small pieces.
  2. Sieve the flour and baking powder into a large bowl.
  3. Add the sugar, egg yolks and butter and mix with a wooden spoon, hand mixer or cold hands quickly into a stiff dough (don’t mix for too long!). Wrap the dough in clingfilm and leave to rest and chill at least 30 minutes in the fridge.
  4. Preheat oven to 190°C, 170°C fan oven, Gas mark 5.
  5. Dust the work surface with a little flour and roll out the dough until it is about 5 mm thick.(if the dough too sticky add more flour but not too much, little by little)
  6. Cut out shapes with a sharp knife or cookie cutters and place on the baking sheet lined with baking paper. Fold the dough scraps together, roll them out and cut out more shapes.(can use any shape of cookie cutters)
  7. Bake in the preheated oven for 15-20 minutes until cooked and lightly browned. Leave the cookies to cool on the baking sheet.
  8. Dust the cookies with icing sugar.(I'm omit this step)
Notes:

Can top up the eye, nose and mouth with melt chocolate with piping bag.
Make it more adorable, use your own imagination.

Wednesday, 10 July 2013

Kueh Lapis(Steamed Layer Cake)


Kueh Lapis or nine layer dessert, one of the delicious kuih muih in Malaysia. We can choose whatever colour we like to make this dessert look fantastic. The children love it because they can peeling each layer with different coloured. My monster request to have more layer to peel next time like 15 to 18 layer.

Adapted from: Nasi Lemak Lover

(with minor changes of the colour layer)

400 ml water

70 gm coarse sugar
5 pandan leaves, knotted
400 ml coconut milk (I'm not using fresh coconut milk, just from can)
180 gm rice flour
120 gm tapioca flour

Red food colouring

Green food colouring

Method:

  1. Boil water, sugar, pandan leaves and coconut milk until sugar dissolved. Discard pandan leaves and set aside to cool completely.
  2. Add in rice flour and tapioca flour, stir to mix well. Strain the batter.
  3. Grease a 7" steam pan with a little oil. Place the pan in a steamer and steam until hot. 
  4. Divide batter into 3 portions, measure by scale to make sure all the portions is even.
  5. Add in food colouring to 2 portion. The last is plain batter.
  6. Pour 1st layer with green batter into steam pan, and steam for 3 minutes over medium high heat.(around 120++gm for each layer)
  7. Pour 2nd layer with white batter into steam pan, and steam for 3 minutes.
  8. Pour 3rd layer with red batter into steam pan, and steam for 3 minutes.
  9. Repeat until all 8 layers set. Add a drop of red food colouring to let red batter to become dark pink batter and steam for 15 minutes.
  10. Leave the kueh to cool completely (take about 6 hours) at room temperature before cutting (use a plastic knife to cut).

Prawn Cheong Fun


Another traditional dim sum, Prawn cheong fun is a must order dim sum when we visit dim sum restaurant. Been making this cheong fun on every Saturday. They can have it how much as they like.

Adapted from : Soul Recipe

Batter

150 gm rice flour
1½ Tablespoon Wheat starch flour or Tapioca flour
2 Tablespoon Corn flour
1 Tablespoon Oil
450 ml Water
1/2 teaspoon salt (I'm used 1/4 teaspoon)
20 pieces peeled, cooked prawn (cut to halve)
Some dry fried onions
(can substitute with any other ingredient like dried shrimp, BBQ pork(char siew) or yau tiew.)

* I'm used half the ingredient to make 10 rolls of cheong fun 
*Can use round or rectangular pan but must be non stick. I'm used 2 prepared pan to quicker the process.

Sauce from monsterandsharkkitchen

2 tablespoon soy sauce
1 tablespoon of vegetable oil
2 tablespoon water
1 tablespoon sugar
1 teaspoon sesame oil

Method for batter:
  1. Mix the rice flour, wheat starch and corn flour together.
  2. Add water slowly and stir continuously.
  3. Add the oil and salt and mix thoroughly.
  4. Set mixture aside for at least an hour.
  5. Prepare your steamer. Place an oiled pan or plate onto the steam tray.
  6. When the water is boiling, ladle and spread a thin layer of batter(just to cover the pan) onto the preheated & oiled non stick pan or plate. Steam for about 3 minutes or until set.
  7. Remove the pan or plate from the steamer, let cold down for 1 minute and use a flat spatula to loose the rice sheet from pan and place the cooked prawns.
  8. Roll up and transfer to a oiled plate.
  9. Cut and sprinkle with dried fried onions 
  10. Serve with your favorite sauce.
Method for sauce:

1. Just heat the ingredients together on a small pan or wok on low heat.


Thursday, 4 July 2013

Sau Bau


Time to celebrate my sister birthday, last year I'm make a bunch of roses for her and this time is her favorite sau bau with lotus filling.
Bun recipe same as my plain mantou  and the filling from my shanghai mooncake lotus filling but need to cut the quantity of the lotus to half.

Method:

  1. I'm prepared the filling one day before and keep in the fridge. When ready to use get it to room temperature.
  2. I'm used 15 gm for each filling and 30 gm for each dough. Make 20 bun.
  3. Take some dough to mix with green food coloring for the leaf.
  4. Divide dough into equal portions and flatten with a rolling pin to make a circle. Then place a filling in the middle, wrap the dough to seal. Place it on square parchment paper, seal side up.
  5. Use a knife, smoothly make a line on the middle of the bun. Don't press it too hard, the bun will crack when steaming. (like some of my bun is crack because I'm press it to hard)
  6. Roll out the green dough and stamp out the leaf. If doesn't have stamp just cut the shape of leaf with knife.
  7. Spread some plain water on dough to stick with the green leaf on both side.
  8. Make the leaf line with knife.
  9. Pour some red food coloring in a bowl and use a toothbrush to sprinkle to the bun.
  10. I'm used the cookies alphabet stamp to make the Happy Birthday word on the bun. You can use your own idea to decorate the little sau bau for the special person birthday.
  11. Arrange buns into a steamer, leave about 1” gab in between buns. Spray water mist over buns, and steam in a preheated steamer on high heat for 12 minutes. Remove buns from steamer and cool on rack to prevent soggy bottom.

Monday, 24 June 2013

Sago Coconut Pudding


Coconut milk is a good friend with sago, they is a good match. Thanks for the recipe.

Adapted from : Happy Flour

(make 8 yields for small mould)

Coconut layer


20 gm rice flour
20 gm green pea flour (I'm used corn flour)
225 ml concentrated coconut milk 
150 ml water
50 gm sugar(I'm used 40 gm)
1/8 teaspoon salt


(I used a can of coconut milk(400 ml)- 50 ml for sago layer and 350 ml mix with some water to get total 375 ml for coconut layer)
(I'm omit the pandan leaves because recently doesn't went to chinese grocery shop, the result coming out still very good)


Sago layer


80 gm pearl sago
2 blades pandan leaves
half pot of water

70 gm palm sugar (chopped)
15 gm sugar
1/4 teaspoon salt
45 ml water
2 blades pandan leaves 

50 ml concentrated coconut milk


Method for coconut layer:

  1. Mix all the ingredients together in a pot until well-blended. 
  2. Cook over low fire until it thicken and bubbles appeared, stir at all time.
  3. Remove from fire.
  4. Spoon coconut mixture into mould and lightly knock it on the table top to even out the surface.
Method for sago layer:
  1. Boil half pot of water and pandan leaves together.
  2. Discard pandan leaves and add in the pearl sago.
  3. Cook until sago appear clear, remove from fire and drain.(remember: all the sago must transparent)
  4. Boil palm sugar, sugar, salt, pandan leaves and water until sugar dissolved.
  5. Strain syrup into pearl sago. 
  6. Add in the coconut milk and stir well.
  7. Return it to the fire and bring to a gentle simmer for a while.
  8. Once it started to boil, remove from fire.
  9. Spoon sago mixture into the half filled mould.
  10. Leave it aside to cool then chill them in the fridge.

Tuesday, 18 June 2013

Char Siew Bao(Chinese Barbequed Pork Bun)


Traditional dim sum, Char Siew Bao is a must order dim sum when we visit dim sum restaurant. Is our family favourites. Been make this bun for many times, more healthy to have homemade dim sum.

Adapted from : Rasa Malaysia


Dough

(30 gm for each dough can make 23 buns-if you prefer more bigger bun use 50 gm)

8 gm instant dry yeast
160 ml lukewarm water
½ teaspoon white vinegar or lemon juice (optional)
280 gm low-protein flour aka hong kong flour
100 gm wheat starch
90 gm icing sugar
30 gm shortening or vegetable oil

10 ml cold water

10 gm baking powder

Filling

(minor changes by monsterandsharkkitchen)
300 gm  char siew, diced
½ tablespoon cooking oil
1 tablespoon garlic
1 medium onion, diced
1 tablespoon oyster sauce*
1 to 2 tablespoon dark soy sauce
1 teaspoon sesame oil
Sugar and pepper to taste*
6 to 8 tablespoon water
Some corn flour

Notes from Rasa Malaysia : *Some store-bought char siew comes with sauce, use it for preparing filling. Omit sugar, oyster sauce and pepper.

Method for dough:
  1. Sift together flours and icing sugar. Place sifted flour mixture in a large mixing bowl and make a well in the middle.
  2. Fill well with lukewarm water, vinegar and yeast. Use a spatula, gently stir the water to dissolve the yeast then slowly bring together flour mixture.
  3. Add in shortening or oil and knead for 10-15 minutes until soft dough is formed. It should be smooth on the surface.
  4. Cover dough with damp cloth and let it rise for 30 minutes or until it is doubled in size. (depend the weather, I'm need 1 hour to rise)
  5. Dissolve baking powder in cold water, sprinkle over dough and knead until well combined. Divide dough into equal portions and flatten with a rolling pin to make a circle. Then place a heap teaspoon of filling in the middle, wrap and pleat the dough to seal. Place it on square parchment paper, seal side up.
  6. Arrange buns into a steamer, leave about 1” gab in between buns. Spray water mist over buns, and steam in a preheated steamer on high heat for 12 minutes. Remove buns from steamer and cool on rack to prevent soggy bottom.
Notes:
There is no need to rest the dough after adding in baking powder, but    if time allowed, rest it for 10 minutes or so to get fluffier buns.Adding a few drops of vinegar into steaming water will produce whiter buns, but this  is optional.Steamer must be preheated otherwise bun would not rise to the volume as it should be.Spray the surface of bun with water mist helps to produce buns with smooth surface after steamed.DO NOT open the lid during the steaming process.If there are yellowish spots on the steamed buns, it means the baking powder is not fully dissolved.
Method for fillings:(I'm prepared one day before and keep in fridge, when ready to use get it out to room temperature)
  1. Heat oil in pan, saute garlic and onion for 1 to 2 minutes.
  2. Add in all other ingredients except water and corn flour, stir fry for 1 to 2  minutes.
  3. Mix together water with corn flour, add mixture into the pan and stir well. Simmer until gravy is thickened.
  4. Transfer to plate and allow to cool, set aside for later use.

Chocolate Oreo Cake


Happy Father's Day to all the lovely Papa in the world included my monster lovely daddy. We love you. Here is your favorites Oreo with Rich Chocolate Cake.

Rich Chocolate Sponge Cake adapted from : Nasi Lemak Lover
Middle layer mousse adapted from : Annie's Eats
(I'm used the top layer of the triple chocolate mousse cake)

8 " round pan with removable base
8 " round cake ring
A round cake board

Cake use 8 " round cake pan
(minor changes by monsterandsharkkitchen)

50 gm corn oil
90 gm full cream milk
20 gm cocoa powder
120 gm semi-sweet chocolate (can use Lindt 70% cocoa or plain chocolate)
6 egg yolks 

6 egg whites 
100 gm caster sugar
90 gm cake flour

Middle layer mousse

1 teaspoon powdered gelatin
1 tablespoon water
180 gm white chocolate, finely chopped
1½ cups double cream

Decorated

Oreo biscuits
Some crushed Oreo biscuits
2 cups double cream

Method for cake:
  1. Heat corn oil and milk over a pot of simmering water.
  2. Add in chocolate, and stir till melted.Add in cocoa powder, stir well. 
  3. Add in egg yolks once slightly cooled.
  4. In another clean bowl, beat egg whites on high speed until foamy, gradually add in sugar and beat till glossy and soft peaks form.
  5. Take one-third of egg whites mixture to mix with the egg yolk chocolate mixture using a hand whisk. Then fold in the remaining egg white using a spatula until well combined.
  6. Sift in the flour, slowly fold well.
  7. Pour batter into a 8” round cake pan with removable base.
  8. Bake at pre-heated oven at 180 c for 40 minutes or a needle comes out clean when inserted in the middle.
  9. Immediately inverted the cake pan and cool on a wire rack.
Method for mousse layer:
  1. Sprinkle the gelatin over the water in a small bowl and let stand at least 5 minutes to soften.
  2. Place the white chocolate in a medium bowl.  Set aside
  3. Bring ½ cup of the cream to a boil in a small saucepan.
  4. Remove the pan from the heat, add the gelatin mixture and stir until dissolved. Pour the hot cream mixture over the white chocolate and let stand about 1 minute. Whisk until the mixture is smooth.  Cool to room temperature, about 5-8 minutes, stirring occasionally.
  5. In the clean bowl of a stand mixer fitted with the whisk attachment, whip the remaining 1 cup of cream at medium speed until it begins to thicken. Increase the speed to high and whip until soft peaks form when the whisk is lifted.
  6. Using a whisk, mix one-third of the whipped cream to the white chocolate mixture to lighten it.  Fold in the remaining whipped cream gently with a rubber spatula until no streaks remain.
Method to prepared the layer:
Use 8 " round cake ring
A round cake board
  1. Slice the cool sponge cake into 2 even layers using long palette knife. 
  2. Place one sponge layer into a 8 inch cake ring supported by a cake board below. There should some allowance surrounding the sponge layer.  Pour half of the white mousse over the first sponge layer. I measured the mousse by weight and divided it evenly into 2 portions. Level the mousse as evenly as possible. Place the cake in the refrigerator for at least half an hour.
  3. After half an hour take out the cake and place some Oreo biscuits on top and pour the balance of the mousse to cover all the Oreo biscuits.
  4. Place the second sponge layer over the mousse layer. Return the cake to the refrigerator and chill until set, at least 2½ hours or overnight.
  5. In the clean bowl of a stand mixer fitted with the whisk attachment, whip the 2 cups of double cream at medium speed until it begins to thicken. Increase the speed to high and whip until stiff peaks form, add in some crushed Oreo biscuits and mix it evenly. Keep in the refrigerator for later use.
  6. When the mousse is set,  wrap a warm kitchen towel around the ring or use a hairdryer to briefly heat up the exterior of the cake ring. Take care not to apply too much heat using the hairdryer. Remove cake ring slowly and steadily.
  7. Spread the Oreo biscuits cream mixture all over the cake and smooth with an offset spatula and decorating the cake with your own fantastic idea.
  8. For the writing, melt some plain chocolate and filled in pipping bag.
  9. Bring cake back to the refrigerator to firm up before cutting. 
  10. Remember , when slicing the cake need to dip the knife in warm water and clean it after every slice. 


Friday, 14 June 2013

Ma Lai Koh(easy version)


Been trying many different recipes for Ma Lai Koh, some is using yeast, some using dark soy sauce and many more. The last I'm prefer the recipes from Corner Cafe. Is easy and the taste good.

Adapted from : Cornercafe


150 gm plain flour
40 gm (4 tablespoons) custard powder
4 eggs
220 gm caster sugar (I'm used 150 gm)
1/3 teaspoon vanilla extract
40 ml (2 tablespoons) evaporated milk
20 ml (1 tablespoon) treacle (molasses), or honey
1 1/3 teaspoons baking powder
1/3 teaspoon bicarbonate of soda (baking soda)
100 ml canola oil

Tip from corner cafe: To approximately measure 1/3 teaspoon, the best way is to first measure 1/4 teaspoon, then add another 1/8 teaspoon ( half of 1/4 teaspoon) to it.

Method:

1. Line the base of a deep 18 cm steaming pan with holes (or 20 cm bamboo steamer) with a double layer of muslin. Grease and line the sides with baking paper. Sift plain flour and custard powder twice and set aside.
2. Whisk eggs for 1 minute, then gradually add sugar and beat until pale and fluffy, and the mixture leaves a trail of ribbon when you lift the beater. Total beating time can be 6 to 10 minutes depending on the power of your beater. (make sure the egg mixture is pale and fluffy)
3. Sift the flour mixture in a few batches onto the egg mixture and fold in after sifting in each batch. Mix in vanilla. Cover the bowl with cling film and set aside for 1 hour.
4. After the batter has rested for 1 hour, start boiling water in a steamer. Stir treacle into evaporated milk and mix well. Sift baking powder and soda then add to the milk mixture, mix evenly making sure there are no lumps of the raising agents. Pour the mixture into the batter with the oil. Fold in properly until evenly mixed.
5. Pour batter into prepared pan and steam over high heat for 45 to 50 minutes, or until cooked. Remember to replenish steamer with hot water whenever it starts to dry up.
6. Serve hot or warm.

Spiral Curry Puffs(Karipap)


Crispy and delicious, my favourite snack from Malaysia. My monster love it so much. 

Adapted from : Sam Tan's Kitchen

(make about 27 yield medium puffs) 

Potato curry filling

1 large onion, finely chopped
2 garlic cloves, finely chopped
2 tbsp curry powder or more
2 large potatoes, cut into small cubes
Salt and sugar to taste
About 1 cup water
1 tablespoon chili powder if prefer more spicy
Few drops of dark soy sauce if prefer darker colour
(can add other ingredients for the filling, like peas or hard boil egg)

Water Dough
300 gm plain flour
½ teaspoon salt
½ cup lukewarm water
1 small beaten egg
1 tablespoon oil

Grease Dough
150 gm plain flour
75 gm cold butter

Method for filling:
(I'm prepared one day before and keep in fridge, when ready to use get it out to room temperature)
  1. Saute the onion and garlic over medium heat until fragrant
  2. Add in other ingredients and simmer, stirring occasionally until all moisture is absorbed and potatoes are tender. Leave to cool thoroughly before using.
Method for water dough:
  1. Combine all the ingredients and knead with your fingers until soft, pliable and non-sticky (or if you prefer, use a dough hook attachment on an electric mixer)
  2. Divide and roll into two equal balls, then cover (otherwise it will dry out) and leave to rest for 30 mins.
Method for grease dough:
  1. Combine butter and flour until it resembles coarse sand. Knead by hand until shiny and smooth, then divide and roll into two equal balls.
Method for wrapping:
  1. Wrap the one ball of grease dough neatly in a ball of water dough.
  2. On a lightly floured surface, roll out into a very thin oval with a rolling pin,
    then roll up tightly from one end to the other like a Swiss roll.
  3. Turn the rolled up tube 90 degrees (so one end faces you) and repeat the previous step- flatten it thinly again lengthwise into a long oval , then roll up tightly like a Swiss roll.
  4. With a sharp knife, slice into 1 cm discs (or thicker if making larger puffs).The spiral layers should be clearly visible.
  5. Flatten each disc into a thin circle with a rolling pin (as thin as you can get it without the layers splitting apart).
  6. Fill with just enough potato curry in the middle- not too much.
  7. Fold over carefully to enclose. Pinch the edges flat and fold in at 45 degree angle to form a rope(I'm not good on this) or if you prefer use mould, place the rolled out pastry onto a curry puff mould. Fold the mould over carefully to enclose, peeling off any excess pastry from the sides.
  8. Deep fry in hot oil over medium-high heat, tossing continuously until golden brown.Remove with a pair of wooden chopsticks or a slotted spoon, shake off excess oil and drain on kitchen towels before serving.

Wednesday, 22 May 2013

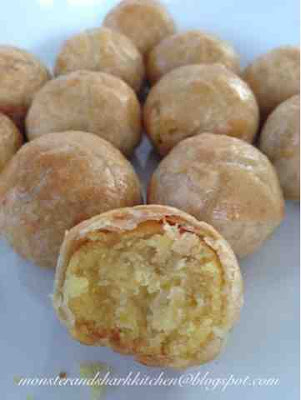
Tau Sar Piah(Mung Bean Pastry)


Every time went to Penang for holiday, this Tau Sar Piah will be a special purchase for everyone. When the family coming to visit, they will bring few boxes for us as well. But the texture is not as good when we consume in Penang. Maybe the long hour flight make it harder and dry. I'm trying to make it myself, the result so good because haven't try Tau Sar Piah fresh from oven. Will need some time to prepared but worth the effort.

Adapted from : Chowtimes


Oil Dough

7 tablespoons all purpose flour
3 tablespoons + 1/2 teaspoon oil

Water Dough

13 + 1/2 tablespoons flour
6 tablespoons + 1/2 teaspoon oil
6 tablespoons water
1/4 teaspoon  white vinegar

Filling

1/3 cup oil
5 shallots, minced
6 tablespoons sugar
1 teaspoon salt
200 gm split green bean

Egg Wash

1 beaten egg

Method for filling: 
  1. Soak the split green beans for at least two hours, drained and steamed for 15 to 20 minutes until the beans are tender.
  2. Mash the beans with a fork until you get a fine texture or press the beans through a sieve, with the back of a ladle to get very fine texture.
  3. To make the filing, heat the oil in a frying pan. Add minced shallots and fry until fragrant but not brown.
  4. Add the mashed green bean, sugar and salt.
  5. Fry until the filling binds together.
  6. Remove from frying pan, pat into a rectangle sheet and divide into 33 pieces.
  7. Roll the filing into balls.
Method for pastry:
  1. For the pastry, first make the oil dough by combining the oil and flour together.
  2. Knead into a dough ball. Divide into 33 pieces
  3. To make the water dough, combine the flour, oil, water and vinegar in a bowl.
  4. Knead into a dough ball. Divide into 33 pieces and roll into balls.
  5. With all the balls ready, you can proceed with rolling the Penang Tau Sar Piah.
Method for wrapping:
  1. Wrap the water dough around the oil dough. 
  2. Flatten it to rectangle (refer to picture-step 1) 
  3. Roll it up like a swiss roll (refer to picture-step 2)
  4. Stand it up and push it down (refer to picture-step 3)
  5. Flatten again to rectangle (repeat picture-step 1)
  6. Then roll it up again like a swiss roll (repeat picture-step 2)
  7. Stand it up and push it down (repeat picture-step 3)
  8. Flatten again (refer picture-step 4). Wrap the filling in the dough.
  9. Preheat the oven to 325F (170C). Egg wash the Penang Tau Sar Piah.
  10. Bake in a 325F (170C) preheated oven for 20 to 25 minutes or until golden brown.
Note:

The size of the dough is small, better to do it on your palm instead of using rolling pin.